Friday, August 21, 2015

European travel scrappage

Hi and welcome to my blog. Have you checked out the latest sketch over at Stuck?! sketches  blog ... it's another great one. I decided to pull out some of my photos of a trip we made to eastern Europe a few years ago.  Here's the sketch:


I went for a clean and simple look for my page.... this one will actually fit easily into my album!!


This was a super quick page... I used a few sheets of paper, some wooden words and shapes and a few other embellishments! I had this page completed in under an hour!! Woop-Woop!!! Wish all my layouts would come together this easily!
 
That's my layout done... thanks for stopping by!


Monday, August 17, 2015

Mojo Monday 411 : God Bless You card

Hi and welcome to my blog. Today is Monday and time for another awesome sketch by Julee Tilman for  Mojo Monday ...


The clean and simple design of this sketch really appealed to me.... so I didn't add any fussy cuts or layers for my card.


I used an older paper collection from Fancy Pants Designs (Summers End) for my paper layers and even my stamps are ones that I've had in my stash for awhile. The flowers are from a real oldie Treasure Life set that is at least 8 or 9 years old and the sentiment is from a newer set called Card Chatter-Sympathy... both stamp sets are from Close To My Heart. The buttons are Stampin' Up! - yep, more oldies!!
 
That's my Mojo card ... thanks for stopping by!


Sunday, August 16, 2015

12 Tags of 2015... August Tag

Hi and welcome to my blog. It's the middle of the month and I'm only now getting a chance to post my August tag for Tim Holtz's 12 tags of 2015.Can you believe that this is tag #8 already???  I love that Tim shows us how to get the most of what we already have in our stash of tools and papers,  through really cool and unique techniques. This month's tag is no exception- Tim uses dies to create a custom background for his tag.


12 Tags of 2015- August | www.timholtz.com


I used my Silhouette machine to create my tag base and then followed along with this month's tutorial (click here for tutorial) for my tag. Here's my August tag.......


My tag is beach themed... lots of summery colors in blues greens and yellow for my tag.  I must admit that when I first applied the inks to my gesso-ed tag I was nervous that the colors wouldn't blend as well as they did for TH tag, but they did!!! I really like this technique and I will be trying it out on future projects!! My seashorse was created on my Cricut Explore machine using the Life is a Beach  cartridge and the words on the tag itself were custom made on my Silhouette machine. I added white pearl paint to the seahorse and then wiped some TH Distress ink in Peeled Paint to the edges. The miniature bottle is filled with glitter in god and blue and tiny seashells that  collected while on vacation in the Bahamas a couple of years ago. I tied a sailors knot with some chunky twine and added a TH metal arrow and a fish ( painted with Weathered Wood distress paint and Peeled Paint). The sand dollar was given a similar treatment. I printed off a quote and cut it into strips and spritzed it with Lindys Stamp Gang Opal Sea Oats Starburst spray .
 
That's my August tag... thanks for looking!!


Friday, August 7, 2015

Mixed Media art box

Hi and welcome to my blog. Mixed media is fairly new to me and while I have so much fun experimenting with textures and styles I still have a lot to learn. Pinterest is an amazing source for techniques , tutorials and of course and endless supply of inspiration! I also found some really great challenge blogs to play along with. Anything But Cute has great monthly challenges... I love that we have a whole month to play along with.... and the DT has stunning samples to get your creative mojo going!! This month they have a magical mood board for us to play along with.....


Isn't this stunning??? There's so much here to be inspired by... the gorgeous colors, the glittery texture and of course all that gold!!! 
 
 
I pulled out my inks, stencils,glitter ( yay, I love glitter!!!) and whatever else I could find to start my project. Take a look....


I have several of these wooden boxes from the dollarstore just laying around waiting to be turned from drab to mini works of art. I started off by adding layers of texture with my stencils and modelling paste ( Prima) and scraps of paper and a bit of painters mesh. Then I spritzed Tim Holtz diastress and Lindys Stamp Gang inks in  browns, blues and yellows( spritzing water between layers ) to achieve the desired effect. I then added more layers of gold tones from Prima Bloom sprays  for the final touch.


I stamped randomly with a few Prima stamps ( honeycomb and script) before I started on the flower cluster. I used mainly Prima flowers which I inked for an aged looked. I made a larger flower from Graphic 45 Topography paper , on my Silhouette diecut machine. The moraccan chipboard was made on my Cricut Explore - I cut sections of the shape and used the same colors as the box .I used strips of paper from the same collection here as well. A few buttons ( I have tons of them in my stash!), wooden shapes, enamel dots, crochet flower, cheesecloth and lace ,glitter, a wooden paintbrush and a bit of gesso on everything completes this cluster nicely.


I made this ART by adding chocolate brown Gelato by Faber-Castell with their Whipped Spackle. I love  the thickness of this medium , yet it's so lightweight and dries very fast. Look at how the letters just pop off the box! Awesome!! I applied TH Distress Glitter ( in gold, of course!!) in random places throughout the box. My last embellishment is this pretty glittery butterfly.
 
I had so much fun creating this altered box, I hope you enjoyed it ,too! Thanks for visiting my blog today!


Wednesday, July 29, 2015

Hello layout

Hi and welcome to my blog. This week I'm playing along with the  current sketch over at Stuck?!Sketches challenge blog . It's another great sketch and I had lots of fun playing along.

First here's the sketch.....


I like the clean and simple design of this sketch but yet there's so much to play with. I used ephemera from Fancy Pants Design Collecting Moments collection and papers from October Afternoon 9 to 5 collection for my layout. Take a look..... 


I began my layout by randomly stamping my green cardstock so that it would frame my patterned papers and photo and then I cut  two strips of dp according to the sketch and I added layer after layer!
I recently purchased Heidi Swapp wood veneer words and ephemera and I love them!! They are so easy to alter ( I just inked mine) and they a great touch to any project...the word "hello" just pops from this page!! Plus they are super lightweight and are thin enough so that the page fits neatly in my album! Yay!!  A lot of my pages have been so bulky that my albums don't really close well anymore, but that's okay cause I love my layouts!!!
 
Anyhoo.... that's my layout using Stuck?! Sketches current sketch... I hope you enjoyed it! Thanks for stopping by my blog today!


Monday, July 27, 2015

' Tis the Season


Hi and welcome to my blog  My daughter recently told me that there are just 17 more Fridays 'till Christmas! While I may not be in a rush to start my holiday shopping , now is as good a time as any to start my Christmas cardmaking! Luckily I have lots of paper goodies to create with and the current challenge over at Jingle Belles is a great place for inspiration. Lauren and Stef  are encouraging us to have an old fashioned Christmas with a vintage or retro style card and one lucky winner will receive a prize pack from Lauren's shop Just Enough Stuff.

I went with a retro style for my card , after several  failed attempts of an old fashion theme. I have several ephemera packs from October Afternoon with some really vintage looking Santa diecut images which I knew I had to use.


I added a little sparkle to Santa's mittens and giftboxes with a green Wink Of Stella glitter pen. I inked the edges of the die image , as well as all the papers. The banner sentiment is a sticker from Fancy Pants Designs and the enamel dots are from Prima. My base paper is Graphic 45 and the brown mat is from My Minds Eye and the ribbon is an oldie from Stampin' Up!


That's my card... just in time for the deadline for the current JB challenge!! Thanks for stopping by and don't forget to check out Jingle Belles for some fun inspiration!


Friday, July 24, 2015

Under the sea mini canvas


Hi and welcome to my blog. While most of the country is enjoying hot summer days , it's been quite the opposite here in Newfoundland ( rain and more rain .... **sigh**)  but at least it gives me a good excuse to play along with Anything But Cute 's current challenge again!  I had so much fun creating a summery layout ( click here to see my layout) that I had to play along again.

Here is the mood board ...


I followed the beach theme a little more with my mini canvas.....


I started off with a 6x6 canvas and I created my own textured background by applying a thick coat of Prima Artbasics modeling paste....I was going for a wave effect. It looks better in RL, I promise !!
 
Then I used various shades of blue and green Deco paints and started painting and painting. I let it each layer dry before  lightly applying gesso to soften the blue tones. I then spritzed the entire surface with Ranger's Perfect Pearls mist in Biscotti. It adds a nice subtle glimmer effect which doesn't really show well in the photo, but trust me, it looks great!
 
Here's a close up....

 
The metal starfish and sanddollar were purchased on eBay and I just painted them and did a little distressing. I cut the seahorse out on my Cricut Explore using the Life is a Beach cartridge. I followed a tutorial on Tim Holtz's blog ( July 2014 tag) to create the crackled grunge look for my seahorse. The sand was a mixture of TH distress glitter in Pumice Stone with a bit of Stormy Sky for contrast. I used some Art basics 3D Gloss gel to adhere it to the canvas.  I hand cut my tag and stamped the base with a ledger stamp from Stampin' Up! Open Sea set ( the anchor on the tag is from this too) and the sentiment is from CTMH , oldie but still a goodie set called Treasure of the Heart. Finally, I added some flat back pearls , a bit of netting and sequins .
 
That's my mini canvas ... hope you enjoyed! Thanks for visiting my blog today!


Thursday, July 23, 2015

UR Loved layout

Hi and welcome to my blog.  Do you scrap in chronological order or just grab a photo and start scrapping? I do both, I have a pile of current photos I plan to scrap but every now and then an old pic will capture my interest and I start from there. I found this older pic of my youngest from when he was just six years old ( oh my, where does time go... he is 12 now!!) and I knew I had to scrap it. The current sketch at Sketchablities is the inspiration for my latest layout.

Here is the current sketch .....


And here is my layout.......


I used lots of older products from my stash to complete this layout... gotta make room for new goodies!! :-) I found the title for my layout on Cricut 's Small Talk &Frames cartridge as well as the polaroid frame for my photo. The stars from the frame were put to use on my page, too. I used stamps from Tim Holtz ( chicken wire)  and CTMH( frames)  for the background  and of course , there's lots of ink splattered about.  A few flowers , some chipboard frames, buttons and brads complete my page.
 
Thanks for visiting my blog.... have a great day!!


Monday, July 13, 2015

Sunshine layout

Hi and welcome to my blog. It's been awhile since I've scrapped anything so I was in need of some good inspiration. The current sketch at Sketchablities is a great place to start and Anything But Cute blog also helped me with my layout inspiration. Here's the sketch I used.....

 
As always , there are so many great elements to this sketch... how can you not be inspired???
 
The current challenge over at Anything But Cute has a mood board .. featuring the beach theme created by the very talented Pamelia. I love the browns and blue and of course the beach theme.


And over at Mixed Media Monthly they also have a fun picture to inspire our creative mojo.


Lots of fun elements here to play along with , right???


My layout is a combo of the three... here it is....
 
 
I wanted a vibrant summery theme for my layout but not too bright so I opted for hues of blues and browns with splashes of colour to make my page pop. The "wooden " paper base and the strips of paper are from Crate Paper and flowers are from Magnolia and Prima.The background was created with some coffee cup stain stencils and  script stamps with a bit of Prima Bloom Spray in Precious Stone splattered about The wooden chippie was embossed with Orange Creamsicle embossing powder from Lindy's Stamp Gang and the flourish was also LSG ep in Madonna Robe Blue Gold and Orange Creamsicle. The tag was a stamp from CTMH which I hand cut out.... I may add a date and some journaling later. To finish off my page, I matted everything on a bright turquoise cardstock base and my layout is finished!!!
 
 Make sure to visit these great blogs for tons more great inspiration from the DT and submissions!
 
Thanks for stopping by my blog today!!


Wednesday, July 8, 2015

12 Tags of 2015... July tag

Hi and welcome to my blog. The tag for July for the 12 Tags of 2015 ( click here for tutorial)  is a patriotic themed tag... I love the tag but unfortunately Stampers Anonymous doesn't have any Canadian themed stamps, so I had to make do with what I have.


Here's the tag for July ........

12 tags of 2015: July | www.timholtz.com


Here's my tag......
 
 
I used a Canadian themed paper for my background and for my strips I used from Stampin' Up! and CTMH , inked TH Distress Ink ( Fired Brick) and followed the tutorial. I happy with how my tag turned out, even though it's very different from Tim's tag.
 
 
That's my tag... thanks for stopping by my blog today.


Tuesday, June 16, 2015

A Mixed Media Father's Day canvas


Hi and welcome to my blog. My favorite aspect of mixed media is that you can take so many types of art forms and mix them together.. stamping , stencilling ... it all works beautifully together to create one of a kind works of art!! Anything But Cute Challenge blog  encourages us to have fun with this style with great monthly challenges. This month 's challenge is Make it Masculine and the DT has great projects to share and inspire so go check them out!!


 Today I wanted to share with you a mini canvas I made for my hubby for Father's day. My husband works out of country so I wanted to make something portable but at the same time durable. I found some thin 7X7 canvas at a local boxstore which are perfect for this type of craft. I started off by using a brick stencil and Prima Art Basics Modeling paste. I love the chunky texture and it's a perfect medium for adding lots of layers of colour!


I love how this canvas looks already and I haven't added anything yet!!
 
I then added layers of color with Lindy's Stamp Gang and Tim Holtz Distress ink sprays. I usually end up going for more brown tones in my masculine mixed media projects but this time I wanted a different look so I used more gray and yellow tones with splashes of black and white.


Next, I pulled out some background stamps. They are great way to add layers without bulk.
 
Now onto the next steps.......
 
 
I heat embossed some chunky argyle pieces that I custom made with my Cricut Explore with a Ranger puffy black embossing powder and for a bit of shine, I then spritzed the pieces with Prima Bloom spray in Precious Stone. I adhered a few strips of washi tape to the two corners. Then I added some Prima embellishments, buttons, ribbon, and a stamped sentiment from CTMH set Family Love , some AC enamel dots, and here is the finished project......
 
 
I love how this turned out and I can't wait to give it to my hubby!!
 
Thanks for stopping by my blog.... have a great creative day!!


Thursday, June 11, 2015

Be happy layout

Hi and welcome to my blog. Summer is just around the corner ( for us , anyways!!) and I can't wait for lazy days spent camping and relaxing on the beach.  Often my paper crafting gets ignored while I'm busy enjoying the short summer that we get here in NFLD. So today , while I'm still dreaming of those long hot days, I have a layout to share with you. I used the fabulous sketch over at Stuck?! Sketches blog for my inspiration. Laura always designs such great sketches that are sure to get your creative mojo going. Take a look at the current sketch:


I'm combining this sketch with the current challenge at The Mixed Media Monthly Challenge blog who are celebrating their one year birthday!!  I only found this blog recently but I'm so glad I did!! Lots of fun challenges and tons of inspiration.... stop by and give the DT some blog love!!!


Here's my layout based on Stuck?!Sketches and MMMC#13 challenge .......


I used papers from an older paper collection I've had - I think it's a Recollection collection, but i'm not sure. The banner and elements are from Authentique Harmony collection. For MMC, I'm using a couple of past challenges... around The House( burlap and sewing) and May Flowers ( umm, flowers!!) and stamps- the splatters are actually from a Stampin' Up! set called Gorgeous Grunge. Love ,love that stamp set!! Of course, I had to add a few Prima flowers and this page is done!! Well, almost.... behind the photo ,I created a pocket for some hidden journaling which I've yet to add!
 
Well , that's my layout, hope you enjoyed. Thanks for stopping by my blog today!!


Wednesday, June 10, 2015

12 Tags 0f 2015... June tag

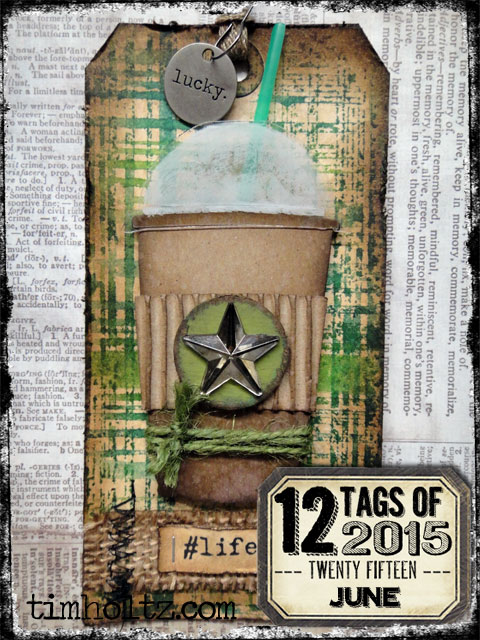
Hi and welcome to my blog.  I've been playing along  with Tim Holtz's 12 Tags of 2015 since January and this month Tim has a new technique to share with us. Tim shows us how to create a plaid background with Distress Inks and stencils.... so cool, huh?? Click here for a link to Tim's tutorial.


12 tags of 2015 - June by Tim Holtz | www.timholtz.com
 
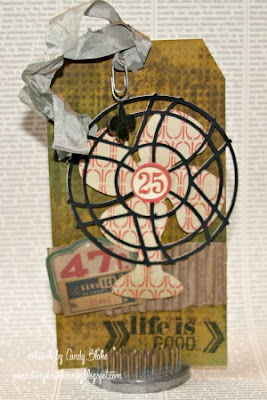
I love how he incorporated a giftcard holder onto this tag.  My tag uses elements I had in my stash to create my own version.
 
 
I created this fun fan using my Cricut Explore and the cartridge . The background was made using the same TH stencil and Distress Ink pads. I stamped the sentiment from a CTMH set called My Life and I added a few TH ephemera pieces , some seam binding ribbon and a clip and metal embellishment to finish off this tag.
Well that's another tag finished!! I'm so loving this...I'm already looking forward to July's tag!!!
 
Thanks for stopping by my blog today!!


Tuesday, June 9, 2015

Mini album.... a work in progress

Hi all.... it's been so long since I last posted!! I've been so busy that I barely spent any time in my craftroom !!  It's nearly mid-June and soon my oldest child will be graduating from high school.... where does the time go??


 Here she is when she finished pre-school ....


 T
And now my baby girl is all grown up...


I've been wanting to make her something special for graduation , so I started a mini album for her.
Here are just a few pics as it is still not finished.


The album measures 6x6 for the cover and the inside pages are 5.75x5.75. I created many of the pockets with my Silhouette die cutting machine and the papers are from Teresa Collins Summer Stories collection. This book is full of fun interactive pages and I can't wait to fill it with photos and surprise my DD with it on her graduation day.
 
Thanks for stopping by my blog today... have a great day!