Showing posts with label Cricut Explore. Show all posts

Sunday, August 16, 2015

12 Tags of 2015... August Tag

Hi and welcome to my blog. It's the middle of the month and I'm only now getting a chance to post my August tag for Tim Holtz's 12 tags of 2015.Can you believe that this is tag #8 already???  I love that Tim shows us how to get the most of what we already have in our stash of tools and papers,  through really cool and unique techniques. This month's tag is no exception- Tim uses dies to create a custom background for his tag.


12 Tags of 2015- August | www.timholtz.com


I used my Silhouette machine to create my tag base and then followed along with this month's tutorial (click here for tutorial) for my tag. Here's my August tag.......


My tag is beach themed... lots of summery colors in blues greens and yellow for my tag.  I must admit that when I first applied the inks to my gesso-ed tag I was nervous that the colors wouldn't blend as well as they did for TH tag, but they did!!! I really like this technique and I will be trying it out on future projects!! My seashorse was created on my Cricut Explore machine using the Life is a Beach  cartridge and the words on the tag itself were custom made on my Silhouette machine. I added white pearl paint to the seahorse and then wiped some TH Distress ink in Peeled Paint to the edges. The miniature bottle is filled with glitter in god and blue and tiny seashells that  collected while on vacation in the Bahamas a couple of years ago. I tied a sailors knot with some chunky twine and added a TH metal arrow and a fish ( painted with Weathered Wood distress paint and Peeled Paint). The sand dollar was given a similar treatment. I printed off a quote and cut it into strips and spritzed it with Lindys Stamp Gang Opal Sea Oats Starburst spray .
 
That's my August tag... thanks for looking!!


Friday, August 7, 2015

Mixed Media art box

Hi and welcome to my blog. Mixed media is fairly new to me and while I have so much fun experimenting with textures and styles I still have a lot to learn. Pinterest is an amazing source for techniques , tutorials and of course and endless supply of inspiration! I also found some really great challenge blogs to play along with. Anything But Cute has great monthly challenges... I love that we have a whole month to play along with.... and the DT has stunning samples to get your creative mojo going!! This month they have a magical mood board for us to play along with.....


Isn't this stunning??? There's so much here to be inspired by... the gorgeous colors, the glittery texture and of course all that gold!!! 
 
 
I pulled out my inks, stencils,glitter ( yay, I love glitter!!!) and whatever else I could find to start my project. Take a look....


I have several of these wooden boxes from the dollarstore just laying around waiting to be turned from drab to mini works of art. I started off by adding layers of texture with my stencils and modelling paste ( Prima) and scraps of paper and a bit of painters mesh. Then I spritzed Tim Holtz diastress and Lindys Stamp Gang inks in  browns, blues and yellows( spritzing water between layers ) to achieve the desired effect. I then added more layers of gold tones from Prima Bloom sprays  for the final touch.


I stamped randomly with a few Prima stamps ( honeycomb and script) before I started on the flower cluster. I used mainly Prima flowers which I inked for an aged looked. I made a larger flower from Graphic 45 Topography paper , on my Silhouette diecut machine. The moraccan chipboard was made on my Cricut Explore - I cut sections of the shape and used the same colors as the box .I used strips of paper from the same collection here as well. A few buttons ( I have tons of them in my stash!), wooden shapes, enamel dots, crochet flower, cheesecloth and lace ,glitter, a wooden paintbrush and a bit of gesso on everything completes this cluster nicely.


I made this ART by adding chocolate brown Gelato by Faber-Castell with their Whipped Spackle. I love  the thickness of this medium , yet it's so lightweight and dries very fast. Look at how the letters just pop off the box! Awesome!! I applied TH Distress Glitter ( in gold, of course!!) in random places throughout the box. My last embellishment is this pretty glittery butterfly.
 
I had so much fun creating this altered box, I hope you enjoyed it ,too! Thanks for visiting my blog today!


Friday, July 24, 2015

Under the sea mini canvas


Hi and welcome to my blog. While most of the country is enjoying hot summer days , it's been quite the opposite here in Newfoundland ( rain and more rain .... **sigh**)  but at least it gives me a good excuse to play along with Anything But Cute 's current challenge again!  I had so much fun creating a summery layout ( click here to see my layout) that I had to play along again.

Here is the mood board ...


I followed the beach theme a little more with my mini canvas.....


I started off with a 6x6 canvas and I created my own textured background by applying a thick coat of Prima Artbasics modeling paste....I was going for a wave effect. It looks better in RL, I promise !!
 
Then I used various shades of blue and green Deco paints and started painting and painting. I let it each layer dry before  lightly applying gesso to soften the blue tones. I then spritzed the entire surface with Ranger's Perfect Pearls mist in Biscotti. It adds a nice subtle glimmer effect which doesn't really show well in the photo, but trust me, it looks great!
 
Here's a close up....

 
The metal starfish and sanddollar were purchased on eBay and I just painted them and did a little distressing. I cut the seahorse out on my Cricut Explore using the Life is a Beach cartridge. I followed a tutorial on Tim Holtz's blog ( July 2014 tag) to create the crackled grunge look for my seahorse. The sand was a mixture of TH distress glitter in Pumice Stone with a bit of Stormy Sky for contrast. I used some Art basics 3D Gloss gel to adhere it to the canvas.  I hand cut my tag and stamped the base with a ledger stamp from Stampin' Up! Open Sea set ( the anchor on the tag is from this too) and the sentiment is from CTMH , oldie but still a goodie set called Treasure of the Heart. Finally, I added some flat back pearls , a bit of netting and sequins .
 
That's my mini canvas ... hope you enjoyed! Thanks for visiting my blog today!


Thursday, July 23, 2015

UR Loved layout

Hi and welcome to my blog.  Do you scrap in chronological order or just grab a photo and start scrapping? I do both, I have a pile of current photos I plan to scrap but every now and then an old pic will capture my interest and I start from there. I found this older pic of my youngest from when he was just six years old ( oh my, where does time go... he is 12 now!!) and I knew I had to scrap it. The current sketch at Sketchablities is the inspiration for my latest layout.

Here is the current sketch .....


And here is my layout.......


I used lots of older products from my stash to complete this layout... gotta make room for new goodies!! :-) I found the title for my layout on Cricut 's Small Talk &Frames cartridge as well as the polaroid frame for my photo. The stars from the frame were put to use on my page, too. I used stamps from Tim Holtz ( chicken wire)  and CTMH( frames)  for the background  and of course , there's lots of ink splattered about.  A few flowers , some chipboard frames, buttons and brads complete my page.
 
Thanks for visiting my blog.... have a great day!!


Tuesday, June 16, 2015

A Mixed Media Father's Day canvas


Hi and welcome to my blog. My favorite aspect of mixed media is that you can take so many types of art forms and mix them together.. stamping , stencilling ... it all works beautifully together to create one of a kind works of art!! Anything But Cute Challenge blog  encourages us to have fun with this style with great monthly challenges. This month 's challenge is Make it Masculine and the DT has great projects to share and inspire so go check them out!!


 Today I wanted to share with you a mini canvas I made for my hubby for Father's day. My husband works out of country so I wanted to make something portable but at the same time durable. I found some thin 7X7 canvas at a local boxstore which are perfect for this type of craft. I started off by using a brick stencil and Prima Art Basics Modeling paste. I love the chunky texture and it's a perfect medium for adding lots of layers of colour!


I love how this canvas looks already and I haven't added anything yet!!
 
I then added layers of color with Lindy's Stamp Gang and Tim Holtz Distress ink sprays. I usually end up going for more brown tones in my masculine mixed media projects but this time I wanted a different look so I used more gray and yellow tones with splashes of black and white.


Next, I pulled out some background stamps. They are great way to add layers without bulk.
 
Now onto the next steps.......
 
 
I heat embossed some chunky argyle pieces that I custom made with my Cricut Explore with a Ranger puffy black embossing powder and for a bit of shine, I then spritzed the pieces with Prima Bloom spray in Precious Stone. I adhered a few strips of washi tape to the two corners. Then I added some Prima embellishments, buttons, ribbon, and a stamped sentiment from CTMH set Family Love , some AC enamel dots, and here is the finished project......
 
 
I love how this turned out and I can't wait to give it to my hubby!!
 
Thanks for stopping by my blog.... have a great creative day!!


Wednesday, June 10, 2015

12 Tags 0f 2015... June tag

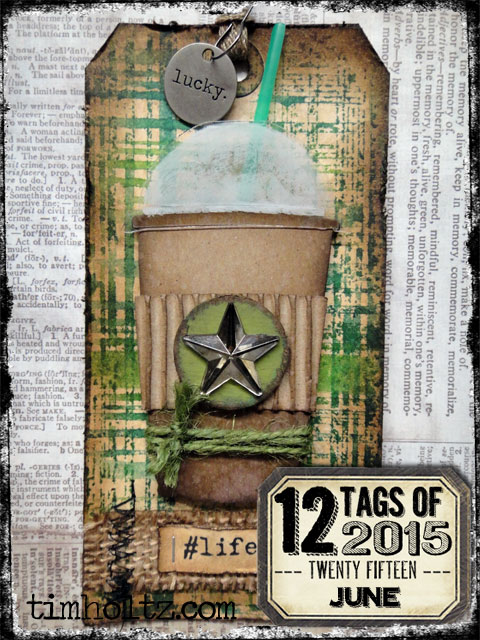
Hi and welcome to my blog.  I've been playing along  with Tim Holtz's 12 Tags of 2015 since January and this month Tim has a new technique to share with us. Tim shows us how to create a plaid background with Distress Inks and stencils.... so cool, huh?? Click here for a link to Tim's tutorial.


12 tags of 2015 - June by Tim Holtz | www.timholtz.com
 
I love how he incorporated a giftcard holder onto this tag.  My tag uses elements I had in my stash to create my own version.
 
 
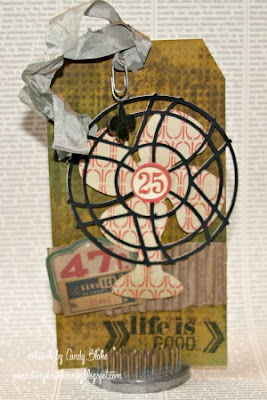
I created this fun fan using my Cricut Explore and the cartridge . The background was made using the same TH stencil and Distress Ink pads. I stamped the sentiment from a CTMH set called My Life and I added a few TH ephemera pieces , some seam binding ribbon and a clip and metal embellishment to finish off this tag.
Well that's another tag finished!! I'm so loving this...I'm already looking forward to July's tag!!!
 
Thanks for stopping by my blog today!!


Wednesday, May 27, 2015

Mojo Monday "Hello" card

Hi and welcome to my blog. It's been awhile since I've played along with Mojo Monday , but when I saw the great sketch by Julee Tillman, I dusted off my supplies and started creating. The tall and skinny card challenges are one of my favorites .. check it out...


The first size is 3.5 x 5.5" and fits a regular A2 envelope with a little room left over to let something (like the circle in this sketch) hang off the 3.5" side. You can use either of the following measurements, depending on where you want your fold.
  • 3.5 x 11" cut of cardstock, score long side at 5.5"
  • 5.5 x 7" cut of cardstock, score long side at 3.5"
For a little more skinny, you can try a 3.5 x 6" card to fit a regular No. 6 3/4 envelope (the ones that are about the size of a personal check).  Use either of the following measurements, depending on where you want your fold.
  • 3.5 x 12" cut of cardstock, score long side at 6"
  • 6 x 7" cut of cardstock, score long side at 3.5"
 
 
Here's my card.....


This was a pretty quick card... all the papers were from Teresa Collins Family Stories 6X6 paper pad, the tag was made on my Cricut Explore using the Small Talk Frames & Tags cartridge and the sentiment is from Simple Stories. I think it took me a grand total of 20 minutes to make this card!!!
 
 
Thanks for stopping by and have a great day!!!


Monday, May 11, 2015

The Good Life layout

Hi and welcome to my blog! I have a CAS layout to share with you today.  used the current sketch over at Stuck! sketches  blog for my starting point.

 Here's the sketch.....


Here's my take on the sketch....


This layout consist almost entirely of elements from one paper pack from Craft Smith called Nautical - this pack is full of fun and unique nautical themes including sheets of tags and journaling blocks. I fussy cut some of these tags for my lay and since this paper is double sided, I got more bang for my buck by using both sides for the strip(s).  The lighthouse is from Cricut's Life is a Beach cartridge and the anchor was cut on my Silhouette machine. Instead of using more paper to create the circle , I used a bit of hemp cording., added a few buttons, some bakers twine and my layout is finished!! Quick and easy... gotta love that!!
 
Thanks for stopping by my blog today!!!


Friday, May 8, 2015

Altered Starbucks bottle... a mixed media project

Hi and welcome to my blog!  We are enjoying a beautiful  sunny day here , although the it's still quite cool... but soon we will be enjoying the lazy days of summer!!!! Many parts of the world may be enjoying flowers in bloom , but not us unfortunately... so I guess I will just have to make my own May flowers! I have a few of these Starbucks Frappuccino bottles just waiting to be altered. Here is what I started out with.....


I covered the entire bottle with some Gesso and then started layering  with texture and colours .......


 I watered down my Prima chalkboard paints and then spritzed them as I applied them to the bottle. I did the same thing with my spray inks, until I achieved the desired look. I love the vintage shabby look of these colors together. Next I dug through my stash for bits and pieces of lace, leaves, wooden accents.... really anything that I thought would look good !


There's a bit of everything here.... some stamping, stencilling, inking.....and of course lots and lots of flowers!!! The tag was made from a Prima journaling pad. I stamped this beautiful sentiment from Flourish stamps and added a few flatbacked pearls and attached it with a mini clothespin.


Here is a closeup of some of the stamping and stencilling that I used. Most of my flowers were from Prima and the lace is actually cut from a 3 inch lace trim I received as a free gift from a recent order... I cut random sections and coloured it with some watered down chalkboard paint ( SeaBreeze). The chipboard sections were made with my Cricut Explore from a Morroccan cutfile I found online. A few buttons, some twine, a metal flower and bling and this project is finished!!!


Im entering this bottle over at The Mixed Media Monthly Challenge for their May Flowers challenge.


I'm also entering this over at Anything But Cute mixed media challenge blog for their first challenge!!!! Yay!! .... another great blog dedicated to all those great mixed media styles ( Thanks Pamellia!!!) . OMG... so much talent from the DT.... love it!!!

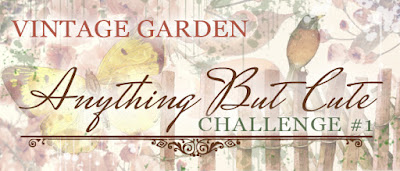
Here's the current challenge...


I hope you enjoyed my little project and thank you  for visiting my blog today!!


Wednesday, February 11, 2015

Mixed media sewing trinket box

Hi and welcome to my blog. I've  mentioned before  about my growing love for mixed media ... and with all the great inspiration to be found , it's so easy to be inspired! There are lots on helpful videos and blogs dedicated to bringing out the mixed media artist in all of us! I've been making altered crafts for awhile but now that I've discovered mixed media I'm addicted!!!  Here's an altered wooden box I made .....


I started off with a simple wooden box that I found at a local Dollarstore ( what a great inexpensive place to find lots and lots of stuff for altering!!!) I wanted to make a sewing themed gift for my mother in law so I found some old sewing patterns I had. I used homemade Modpodge to adhere the pieces  on the top of the box.


I added layers until I got a good coverage and then I applied a coat of Gesso over the entire surface to secure it and to soften the patterns before adding my layers of ink.


I painted the rest of the box with Prima's Chalkboard paint in Egg Blue. Then  I used various sprays ( you can see in the pic which ones!!) and added layers and layers of color. I spritzed each layer with water to blend and then dried it before moving on to the next layer. When I finally got the look, I used a pretty vintage rose stencil from Tim Holtz and Golden Crackle Paste for the bottom corner and when it dried I applied Prima edger ink in Metallic Pink over in and around the edges of the lid.


I cut out a dress form and scissors from chipboard using my Cricut Explore . The dress form was  painted with Prima chalkboard paint in Eggshell and sprayed with Ranger's Perfect Pearl Mist in Bronze for a little glimmer. The scissors were glammed up using Tim Holtz Distress Glitter in Antique Linen. I adhered a variety of flowers, buttons ,ribbon,Prima jewels and sewing products until I achieved the desired look. Finally, I adhered some sewing patterned paper ( stitched, of course)  to the sides, added another die cut and painted flourish, buttons and flowers to complete this box.
 
I really pleased with the end result and I hope my mother in law enjoys it, too!
 
I'm entering this over at The Mixed Media Monthly Challenge for their " Think Pink" challenge .
 
Thanks for visiting my blog today!


Saturday, January 3, 2015

Warm friends on the coldest days

Hi and welcome to my blog! Have you made a new years resolution yet? I don't usually, probably because I tend to forget them by mid-January!! This year I hope to keep my goal of spending more creative time .... documenting my family , actually making cards ahead of occasions instead of at the last minute and maybe I might even manage to dust off my sewing machine and start last years projects!!!! Here's my first card of 2015 .... it's for the current Friday Mashup challenge:


This week's Mashup Challenge is:

  • Create a project with a "Winter theme". 
  • Create a project  with "Snowflakes". 
  • or Mash it Up! and create a "Winter project with Snowflakes".


I purchased this cute little digi image a few years ago ... the files came with ready to color images and this adorable pre-colored sweet girl and kitty. I uploaded her to my brand new Cricut Explore ( Xmas gift from hubby this year!!) and used the print and cut feature. I love how well it cut all the details ... with no white spaces!! This feature is probably my favorite thing about the Explore , but it will never replace my beloved Silhouette machine! The papers are from a Crate Paper 6X6 mini pad called Bundled Up. I love the pink snowflake paper , actually I love all the papers in this collection... its a perfect collection for winter themed papercrafts and the colors are so much fun to play with!


I pulled out my Bigshot for the hexagon shape( Spellbinders) and the pink snowflake.  I used a sentiment from CC Designs stamps called Winter Chuckles , inked in CTMH Juniper ink. A few buttons , some clear Wink of Stella glitter to the snow and my card is complete!!!
 
Thanks for stopping by my blog today!