Showing posts with label Silhouette. Show all posts

Sunday, August 16, 2015

12 Tags of 2015... August Tag

Hi and welcome to my blog. It's the middle of the month and I'm only now getting a chance to post my August tag for Tim Holtz's 12 tags of 2015.Can you believe that this is tag #8 already???  I love that Tim shows us how to get the most of what we already have in our stash of tools and papers,  through really cool and unique techniques. This month's tag is no exception- Tim uses dies to create a custom background for his tag.


12 Tags of 2015- August | www.timholtz.com


I used my Silhouette machine to create my tag base and then followed along with this month's tutorial (click here for tutorial) for my tag. Here's my August tag.......


My tag is beach themed... lots of summery colors in blues greens and yellow for my tag.  I must admit that when I first applied the inks to my gesso-ed tag I was nervous that the colors wouldn't blend as well as they did for TH tag, but they did!!! I really like this technique and I will be trying it out on future projects!! My seashorse was created on my Cricut Explore machine using the Life is a Beach  cartridge and the words on the tag itself were custom made on my Silhouette machine. I added white pearl paint to the seahorse and then wiped some TH Distress ink in Peeled Paint to the edges. The miniature bottle is filled with glitter in god and blue and tiny seashells that  collected while on vacation in the Bahamas a couple of years ago. I tied a sailors knot with some chunky twine and added a TH metal arrow and a fish ( painted with Weathered Wood distress paint and Peeled Paint). The sand dollar was given a similar treatment. I printed off a quote and cut it into strips and spritzed it with Lindys Stamp Gang Opal Sea Oats Starburst spray .
 
That's my August tag... thanks for looking!!


Friday, August 7, 2015

Mixed Media art box

Hi and welcome to my blog. Mixed media is fairly new to me and while I have so much fun experimenting with textures and styles I still have a lot to learn. Pinterest is an amazing source for techniques , tutorials and of course and endless supply of inspiration! I also found some really great challenge blogs to play along with. Anything But Cute has great monthly challenges... I love that we have a whole month to play along with.... and the DT has stunning samples to get your creative mojo going!! This month they have a magical mood board for us to play along with.....


Isn't this stunning??? There's so much here to be inspired by... the gorgeous colors, the glittery texture and of course all that gold!!! 
 
 
I pulled out my inks, stencils,glitter ( yay, I love glitter!!!) and whatever else I could find to start my project. Take a look....


I have several of these wooden boxes from the dollarstore just laying around waiting to be turned from drab to mini works of art. I started off by adding layers of texture with my stencils and modelling paste ( Prima) and scraps of paper and a bit of painters mesh. Then I spritzed Tim Holtz diastress and Lindys Stamp Gang inks in  browns, blues and yellows( spritzing water between layers ) to achieve the desired effect. I then added more layers of gold tones from Prima Bloom sprays  for the final touch.


I stamped randomly with a few Prima stamps ( honeycomb and script) before I started on the flower cluster. I used mainly Prima flowers which I inked for an aged looked. I made a larger flower from Graphic 45 Topography paper , on my Silhouette diecut machine. The moraccan chipboard was made on my Cricut Explore - I cut sections of the shape and used the same colors as the box .I used strips of paper from the same collection here as well. A few buttons ( I have tons of them in my stash!), wooden shapes, enamel dots, crochet flower, cheesecloth and lace ,glitter, a wooden paintbrush and a bit of gesso on everything completes this cluster nicely.


I made this ART by adding chocolate brown Gelato by Faber-Castell with their Whipped Spackle. I love  the thickness of this medium , yet it's so lightweight and dries very fast. Look at how the letters just pop off the box! Awesome!! I applied TH Distress Glitter ( in gold, of course!!) in random places throughout the box. My last embellishment is this pretty glittery butterfly.
 
I had so much fun creating this altered box, I hope you enjoyed it ,too! Thanks for visiting my blog today!


Tuesday, June 9, 2015

Mini album.... a work in progress

Hi all.... it's been so long since I last posted!! I've been so busy that I barely spent any time in my craftroom !!  It's nearly mid-June and soon my oldest child will be graduating from high school.... where does the time go??


 Here she is when she finished pre-school ....


 T
And now my baby girl is all grown up...


I've been wanting to make her something special for graduation , so I started a mini album for her.
Here are just a few pics as it is still not finished.


The album measures 6x6 for the cover and the inside pages are 5.75x5.75. I created many of the pockets with my Silhouette die cutting machine and the papers are from Teresa Collins Summer Stories collection. This book is full of fun interactive pages and I can't wait to fill it with photos and surprise my DD with it on her graduation day.
 
Thanks for stopping by my blog today... have a great day!


Monday, May 11, 2015

The Good Life layout

Hi and welcome to my blog! I have a CAS layout to share with you today.  used the current sketch over at Stuck! sketches  blog for my starting point.

 Here's the sketch.....


Here's my take on the sketch....


This layout consist almost entirely of elements from one paper pack from Craft Smith called Nautical - this pack is full of fun and unique nautical themes including sheets of tags and journaling blocks. I fussy cut some of these tags for my lay and since this paper is double sided, I got more bang for my buck by using both sides for the strip(s).  The lighthouse is from Cricut's Life is a Beach cartridge and the anchor was cut on my Silhouette machine. Instead of using more paper to create the circle , I used a bit of hemp cording., added a few buttons, some bakers twine and my layout is finished!! Quick and easy... gotta love that!!
 
Thanks for stopping by my blog today!!!


Tuesday, April 14, 2015

A Shabby Chic -mixed media card

Hi and welcome to my blog. I love the look of shabby chic especially when its combined with mixed media techniques/styles. Most of my projects these day are a blending of these two and this card is no exception. I had some beautiful floral papers leftover from a previous project , and after distressing, stencilling, etc, I came up with this card......


I used a grid stencil with some Prima Modeling Paste and the stamped chicken wire (Tim Holtz Aged Mahogany)  on the base. For a bit more texture I added a bit of cheesecloth and then started layering my flowers ( Prima , Wild Orchid Crafts, Petaloo). I had the butterfly cut already ( Silhouette cutfile)  and the ribbon and hemp twine are from my stash. The twig is leftover from my son's diorama project.... anything left in my craftroom is not safe from me!!! The banner sentiment and floral papers were from a kit I purchased at Frosted Designs.
 
 
I'm entering this card over at The Mixed Media Challenge for their flowers challenge. Here's the inspiration photo and info:
 

HOW TO PLAY
1. Create a mixed media CARD based on the theme, with or without the optional element.
2. Display the challenge graphic on your blog post and link back to this challenge post.
3. You may enter as many times as you want, as long as each entry is different.
4. You may combine a maximum of 7 challenges (6 other challenges plus ours).
5. Submit your projects by April 25, 11:55 p.m. PDT (GMT-7).
6. We'll announce the winner and highlights on April 30.
 
Adding a basket to your card was the optional element, which I opted not to use , although I may have to make another card with this element.
 
That's my card for today... thanks for stopping by!


Monday, April 6, 2015

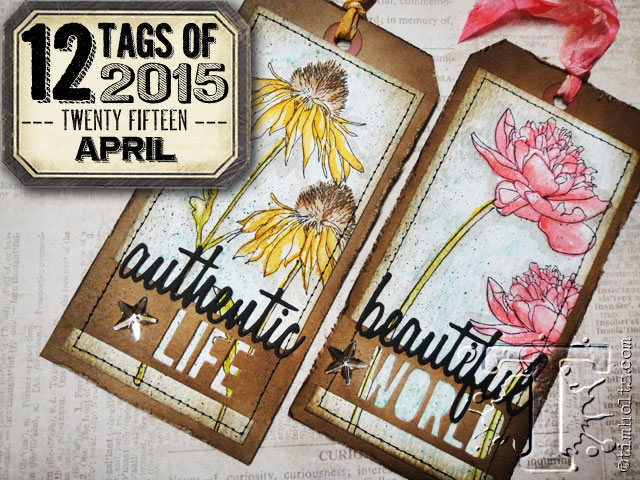
Twelve tags of 2015 ... April tag

Hi and welcome to my blog. Although I made my tag as soon as the new tag was posted on Tim Holtz's blog , I'm only just now getting around to posting it! Here's the link to the April tag  and here are Tim's tags....


mainimage
 
 
I really loved these tags... they made me  feel hopeful that spring is finally here.... even if we are still buried under tons of snow!!!!
 
 
I used my Silhouette Cameo machine to make my base tag ,and then searched through my stamps to find one to go with the tag and here's what I made.....


I used a Stampin' Up! stamp set called Pleasant Poppies.. it was one of the last stamps I purchased as a Demo ( more than three years ago) and I'm only now just inking it .  I dusted off my Spritzer tool ( another leftover from my SU days) , got out my TH inks and markers and aqua pen and I followed the tutorial to create this tag.  I'm super happy with how it turned out!
 
Well, that's my April tag... thanks for stopping by!


Sunday, April 5, 2015

Winged things card

Hi and welcome to my blog. Today is special day , Easter. I hope you are enjoying a wonderful Easter with your family.

I have a card to share with you today ...its for a challenge over at  the Really Reasonable Ribbon blog . The theme for this challenge is ' Things with Wings" and to use lace, ribbon or trim on your project , which can be a card, layout, décor piece, etc.
  
 
Here's my card for this challenge;


I used a bit of Melissa Frances lace trim and my butterfly was cut on my Silhouette machine and spritzed with a bit of Prima Bloom Spray in Peony for a hint of glimmer. I used an assortment of mini rosebuds from Wild Orchid Crafts and flowers/leaves from Prima. the larger pink roses are actually a bargain store find!!! I added some gesso and a bit of Tim Holtz Distress Glitter in Pumice Stone. The pearls are actually a strip ( another great $$$ store find!!) and all the papers are odds and ends from other projects. The sentiment is a Verve stamp , inked in TH Frayed  Burlap. The chicken wire stamp on the base layer is a Darcie's Heart and Home stamp and I used a bit of Prima Modelling paste and a TCW  mini dots stencil for a bit of texture. The bling flourish is from Zva.
 
Well, that's my card for today.... thanks for stopping by!


Wednesday, March 11, 2015

These are the best days layout

Hi and welcome to my blog. I can't believe that I will have a daughter graduating from high school this year.... where does the time go??? It seems like only yesterday that she was going off to preschool and now she will be moving away in the fall to go to college. This layout is with her last school photo ( besides grad ) and I decided to go with the theme of time for this layout.
Here it is.....

 
I created my own colored modeling paste by mixing a green and blue  Faber- Castell Design Memory Craft Gelato together ( added a bit of water to mix ) and then added some Whipped Spackle. I then used a clock stencil from The Crafters Workshop and stencilled randomly over the page. The ledger has  bluish green lines , which I was hoping to match. I didn't quite achieve a perfect match but I like the color I came up with! I used a variety of flowers and chipboard from Prima and ephemera from my stash. The clock was cut on my Silhouette and sprayed with Lindys Stamp Gang inks.
 
I'm entering this layout over at Faber-Castell Design Memory Craft blog for their Time challenge.
 
Thanks for stopping by my blog today!
 

Monday, March 2, 2015

Mojo Monday inspired cards

Hi, I'm back with a couple more cards to share with you. I'm using the current sketch over at Mojo Monday as my inspiration. Here's the latest sketch:

 
I made two cards for using papers from Fancy Pants Designs Collecting Moments 6X6 paper pad.


I made the sentiment mats using a cutfile and my Silhouette machine . The sentiment for the first card was from a CTMH set called Treasure Life  and the second card greeting is from C.C Designs set called Sassy Sentiments. I think this may have been the first time in ages where I didn't ink, stencil or distress my card in any way!!! The only altering I did was add some Stickles to the flowers . So quick and easy but I love them both!!!
 
That's my Mojo cards this week... hope you enjoyed! Thanks for dropping by!


Monday, February 9, 2015

Shaped Santa card

Hi and welcome to my blog. It's been snowing heavily for a week straight and it really looks like a winter wonderland out there! I'm so ready for spring!!! ** sigh*** But since it's still looking very wintery out there, I'm still in the mood for Christmas cards!!  This week over at Jingle Belles Stef and Lauren are asking us to get in shape for the holidays.... luckily no workouts are needed for this challenge!! All you need is to make a shaped card... whew! I can do that! I recently purchased a few cutfiles from SVG Cuts ( love , love that place!!) and one of the files is a shaped  Santa  card. Here is my  shaped card .....


This Santa reminded me of old-world style Santas , which I love. I used papers from a 6X6 paper pad from American Crafts called Kringle and Co. for the suit and hat. The trim and beard were cardstock, and embossed with a couple different folders. The beard was accented with some glitter for a little sparkle. The Santa is from SVG Cuts file called Santas' Visit and the wreath is from SVG Attic 's set Winter Wishes. The sentiment is from CTMH set Peace on Earth.
This was a fun card to assemble and I'm glad I got it finished in time for the current JB challenge.
Thanks for stopping by my blog today!


Wednesday, February 4, 2015

Mixed Media card and Mojo Monday

Hi all! This week over at Mojo Monday its contest time ( yay!!) and they have a fun sketch , as always, to get your creative mojo going. This week's sketch is brought to you by Julee Tillman , here it is:

 
As if this sketch isn't enough to get your mojo going, the DT have some great samples posted in the first seven entries, plus soooo many great submissions are already  up for your viewing pleasure!!
 
Here's my take on the sketch:


I'm really loving the mixed media style right now..... it's just so much messy fun playing with inks, gesso and all the other awesome products out there!!!
I started off with a floral card base, added a bit of chicken wire stencil and then added my layers. Instead of a strip of paper as per the sketch, I used a large frame , with I inked and stamped using Tim Holtz stamp pads and music script stamp. The flowers were made with my Cricut and were inked with more TH sprays. The butterfly was fussy cut from a small tag. The buttons, and lace  and metal corner tag are from my stash. Finally, to finish off this card I created a smaller mat , inked it up and stamped flowers and the sentiment from Verve 's Hope Blooms set. A splattering of watered down gesso over the entire surface completes this card!!
 
 
So that's my card ....  hope you enjoyed it!
Thanks for visiting my blog today!


Tuesday, January 20, 2015

Jingle Belles : in with the new challenge Christmas cards

Hi and welcome to my blog. I have a couple of cards to share today. I'm a big fan of online shopping - no lineups and with all the great papercrafting goodies out there, the selection is amazing!! But... I have to wait until they arrive by snail mail and that can take weeks . I got some new fabulous Tim Holtz Alterations dies just before Christmas but I never got a chance to really use them. What better time than now when the ladies over at Jingle Belles are challenging us to play with our new goodies.


Here are my cards.......


I used the candles die for this card and a background stamp from Spellbinders , which I colored with my Copic markers. I loved the 3D effect I got when I added Rock Candy Crackle paint to the leaves , with glitter( all Tim Holtz products). Sooo pretty!!!! The leaves are cut with my Silhouette machine and the red flower is from Prima. The sentiment is from Flourishes stamp set called Sentimental Christmas.


And my second card....


I absolutely love the Tattered Poinsettia die from the  TH Alterations line. It looks great just diecut out cardstock or pretty paper but it is stunning when altered! I started out with a diecut from blue cardstock, then stamped it , inked it , distressed the edges and finally added some glaze and glitter. A jingle bell with some glitter for the center and a bit of twine and this poinsettia is all ready for this card! I stamped the base with another new TH product , Christmas Blueprints 4 .The greeting  from Whimsy stamp set ,Christmas Moments , was heat embossed in dark red.
 
 
Hope you enjoyed my cards.... thanks for stopping by today!


Friday, January 9, 2015

A winter visitor layout

Hi and welcome to my blog! Today is another wintery stormy day here on the southwest coast of Newfoundland.... three storms in one week, and it's only early January!!!! Oh well, at least I can stay inside and get some more scrapping done!!  For this layout I'm playing along with the current sketch over at Sketchablities.


Here is my interpretation of the sketch........


I snapped this photo of a young moose in our front yard last winter ... we often see moose munching on birch trees but they generally run away at the first sound. Not this guy, he kept on munching till he had his fill and then casually strode away, even looking back a few times. That's when I got this photo.... you can't see my dog, but he was in the window looking out and barking - loudly!
 
I followed the sketch as much as possible.For my base layer,I used a sheet of snowy patterned paper from Stampin' Up! which I then  stenciled , inked and stamped , using the sketch as a guide. I created the photo mat out of scrap Glitz Design papers - more distressing and inking here, too. I cut branches from  an online file from Silhouette from brown cardstock . I inked it with Tim Holtz Gathered Twigs ink and then a coat of clear Crackle paint (Tim Holtz) was applied over each branch. I used the relief of the branch cut out to stencil some branches throughout the layout. A layer of Faber Castell Glass Bead was added before all those other layers. To finish off the page , I added a title using Thickers alphas.


That's my layout... hope you enjoyed it.
Thanks for stopping by my blog today..... have a wonderful creative day!


Wednesday, December 31, 2014

Happy New Years!

Hi all! Can you believe it's the last day of 2014 ???! Wow, what a busy six weeks it's been!  My craft room was a glittery disaster area! I managed to find some time last week to tackle the mess, and dig out my paper crafting supplies! They were hid under rolls and rolls of decomesh and ribbon.... but now they regained their rightful place in my room! *** happy dance*** I still am looking for my creative mojo , but I did get a few pages completed. Take a look...


I used Prima North Woods collection papers, which I  randomly stamped with a Tim Holtz Christmas stamp (Christmas Blueprint). For texture I used Finnabair /Prima Texture Paste in Platinum Crackle and a custom made polka dot stencil ( Silhouette machine), and then splatters of red and tinsel spray ink ( Heidi Swapp) and then more stenciling! this time I used Tim Holtz  tarnished brass Distress Stain on a 6X6 The Crafters Workshop stencil ( mini sketch grid). Finally, a few flowers from Prima and embellishments from Teresa Collins, Zva rhinestone flourishes   and sequins from an unknown source. Bits of glitter were added, thanks to Wink of Stella brush pens,on the reindeer, snowflake , flowers and the pine branches . I'm not much for journaling ( I know, terrible!!!) so I just added  Thicker numbers for the year.


This page was actually started three months ago! I love Graphic 45 paper lines , especially this one ... Couture. It didn't need much, just a few Prima chipboard accents and flowers from Petaloo and a vintage looking feather from Bella Blvd. I finished it up by adding a few rhinestones ( adhered with my Silhouette heat tool) and a glitter tape  strip by American Crafts. Of course, there's a bit of stenciling on the base layer!!
 
I hope you have a wonderful New Year's !!


Thursday, October 23, 2014

Thinking of you card

Hi and welcome to my blog. Have you checked out the latest sketch from Cardabilities- its another great one! Of course, the DT has great samples for your inspiration too!


Here is the current sketch:


And this is my interpretation of the sketch:


I started off with a charcoal grey cardstock base and then a 6X6 dp from Recollections. I used a diecut from Silhouette , which I inked with Prima Fluid chalk inks ( dusty attic) and edged with Tim Holtz stain ( vintage photo). I cut a piece of the flourish and adhered it to the bottom of my card, then added a few Prima small flowers and a larger Petaloo flower, a couple of beaded stickpins and some sequins. The sentiment is from Verve stamps called Small Phrases. Oh, and  used my favorite distressing tool from Prima to rough up the edges of my dp. This card was quick and simple!!!
 
Thanks for visiting my blog today! Have a wonderful creative day!!