Monday, July 28, 2014

A boy's first love layout

Happy Monday! We've had a lovely and unseasonably warm summer so far , but today the skies are grey and it's threatening to rain... the perfect excuse to stay inside and scrap! It's been mainly just me and my youngest boy home all summer ... the eldest is working and the middle child away for a six week camp... so most of my pictures are focused on boy activities... like checking out car shows! This layout is all about Ethan's first love ...cars!! Does he ever love them and he knows so much about cars/trucks ( especially classic vehicles) from their engines, models, all the things I never needed to know before!!

This layout is dedicated to his love of cars..........


I started off with a distressed looking piece of cardstock from My Mind's Eye and then used my The Crafter's Workshop stencil and Tim Holtz distress stain in Vintage Photo to  add a bit of grungy  chevron to the base. The rest of my papers came from an old Cosmo Cricket 8X8 paper pad that I've had forever! It already looked grunged up so I only had to distress the edges a bit and ink the yellow strip and that was all! Pretty simple! I made my title using my Silhouette machine and I stamped a few sentiments on the yellow banner from a Simple Stories stamp. The blue and orange chevrons were stamped with a CTMH stamp and then handcut and adhered to the page . I scattered a few Prima Sugardots around the page, and a couple of Basic Grey elements and that's it!! I'm entering this layout over at Scrap The Boys blog for their boys and their toys challenge. They have lots of great DT ideas to get all your boy pages done!!
 
I hope you enjoyed my layout.... thanks so much for visiting my blog today!!


Sunday, July 27, 2014

My fav guys layout

Hi! I'm always on the lookout for great sketches to help me get my layouts started ( and finished !!!) and I found this one over at  Once Upon a Sketch .Check out their awesome sketch to and challenge to include numbers in your layout.


Here's my interpretation of the sketch:


I started off with a sheet of Authentique dp for my layout base and then grabbed some of my favorite stencils: Crafters Workshop for the chicken wire and stains and a Tim Holtz Dots Fade . The title was created using some old chipboard letters and the 2Fav was made with my Silhouette machine .Most of the elements are from Basic Grey , except the journaling pocket, which is a BoBunny tag pocket, which I stamped with CTMH and Simple Stories stamps. The metal arrows are from CTMH and the enamel hexagon dots are from Prima.
 
I love how quickly this layout came together... thanks to a great sketch!
Thanks for visiting my blog.... have a great day!


Friday, July 25, 2014

Hello card

Featured Designers #103
My card was a Featured Designer pick at Cardabilities!


Hi all! There's nothing like a great sketch or challenge to get your creative juices flowing. I love Pinterest because you can search for tons and tons of ideas . sketches... whatever you need to get creating! This time I turned to Cardabilities  for my inspiration. I love their sketches ( and their scrappage sketch layouts ,too!!)  Here is the latest card sketch ....

 
And here's my card.............


I played around with my Crafters Workshop coffe stain stencils, Tim Holtz Distress stains, Prima fluid chalk inks and an old SU! polka dot stamp for the background. The label mat is a Waltzingmouse stamp and the sentiment is from Simple Stories ( inked with SU! Basic Grey) and the sequins and small flowers are from Prima and the larger flower is from Wild Orchid Crafts. The thread is my sewing stash .
 This was a fun sketch to use... I'm sure I'll make another card using it for inspiration!!!
 
I hope you enjoyed my card.... don't forget to check out all the great DT cards and fab submissions over at Cardabilities!!
 Thanks for stopping by today... have a great weekend!!


Monday, July 21, 2014

Oh Snap ! box card

Hi  again! I'm back to share a cute little box card I made using the fabulous boxcards from SVG Cuts. I just love the versatility of the Parkside Row set from SVG Cuts .... especially this fun boxcard.

Take a look:


This instant camera was a breeze to put together.... but if you need a great tutorial check out Mary's YouTube video here  on how to put together and the other pieces from Parkside Row together.
I searched through my stash and found a black polka dot paper that was striped on the other side... which is what I used for the sides and front section. A fun arrow paper from American Crafts was originally for travel but I love all those bright colors... they just pop from the black! The camera lens was filled in with an oh snap ! stamp and I used an acetate for the camera flash. The back panels are pretty basic, except I made one into a pocket that holds a giftcard or a note. You could even personalize this already awesome boxcard with photos on the back panels.... just let your creativity go!!!
Thanks for visiting my blog and I hope you have a creative day!!


Parkside Row SVG Kit - Assembly Tutorial


Jingle Belles: taking a header

Hi! Have you checked out the latest challenge Jingle Belles .... well you should!!!! It's called taking a header and is inspired by their awesome blogheader designed by Lauren:


Here's my card :
 
 
I love the purple hues paired with silver and cream, with glittery touches, so I tried to capture that style for my card this week. I started off with a snowflake cluster made using the Anna Griffen Winter Wonderland cartridge and my Cricut machine. I cut this shape out first on silver cardstock at 5.75 inches and then used two shades of purple ( can you see the slight glimmer to them- it's there ,I promise!!) for the various snowflakes. The background is a piece of cardstock that just happened to be on my worktable right now!! See, sometimes it's good not to clean up right away!!!! LOL
I used glitter tape ribbon from American Crafts for the banners - I had a silver trim on first but I like this more. Of course, there's bling all over the place A stamp from Recollections ( Michaels) in SU! Concord Crush ink and this card is done!!! 
 
I hope you've enjoyed my JB card today... thanks for stopping by!!


Saturday, July 19, 2014

It's a wonderful life layout


Good morning! I'm back to share another layout with you. This one was inspired  by the current sketch at Sketchabilities.... take a look:


I just love everything about this sketch!! It allows me to play with my inks, stencils and paper, lots of paper! Here's my take on the sketch:


For more inspiration to complete this layout I followed the current Friday challenge at Frosted Designs which was to use flowers and stitching on a layout. Hmm, lets see, do I love flowers ??? YES!!! And stitching,too, so this challenge was super fun to take part in!!
 
My layout started off with a simple piece of cardstock... inked up with Prima fluid chalk resist ink ( goes on like a dream!!!) ,splattered some gold Glimmer Mist about and then stamped with an old Stampin' Up! weathered background stamp ( removed from bulky wooden block and now I love it!!) and some Stamper' s Anonymous music notes stamp and then stencil with a brick pattern that I made with my Silhouette machine. Next come the papers... all Teresa Collins ( love her vintage style sooo much!!!) I used papers from her Vintage Finds collection, which I have in a 6X6 paper pad... cut them out in various sizes, inked them and even made a few flowers and tags with leftover scraps.The mini alpha stickers and gold border strips are from her Summer Stories collection. Oh yeah, and for the stitching part, well that's on my sparkly border strip, and the bingo papers , plus I randomly adhered some black thread around the corner. The chipboard title and flower are Prima ( inked too)and the rest was found in my stash. Despite all the details and layers, this page came together in under an hour thanks to great inspiration from Frosted Designs and Sketchabilities!!!! Gotta love that!
 
Anyway... that's my layout! The sun is shining and I'm off to enjoy it!! Thanks for stopping by!!


Monday, July 14, 2014

Bahamas Zoo - a double page layout

Hi all! After participating in  the current Jingle Belles and Shopping Our Stash combined challenge ( click here to see my card), I decided to pull out some of my older papers and get scrapping. I still have lots of pics from our family vacation to the Bahamas a few years ago, so I decided to use those,too! Here's what I came up with.....


I have a board dedicated to multiple photo /2 page layouts on my Pinterest site, which is where I found the inspiration for this layout. I grabbed a few sheets of this really bright American Crafts dp called Abode. The fun colors reminded of the vibrant colors of the Bahamas. The tags, pocket and journaling block are all from Simple Stories. The buttons are from my stash and the good times and arrow and chevron stamps are from CTMH set called Take Note. The cardstock is from my dwindling Stampin' Up! 12X12 cardstock. It's been over two years since I was a SU demo and I still have a substantial amount of 8.5X11 and 12X12 cardstock left!!
I love getting my layouts completed this quickly!!!
 
 
Thanks for stopping by!!


Sunday, July 13, 2014

Peace wishes .... a July Christmas card

Hi all! I hope you're enjoying a beautiful summer day .... we've had a lovely summer so far, which means I spend more time at the beach than I do in my craftroom these days! That's okay , 'cause I know our warm weather is short lived here so I'm gonna take advantage of it as much as possible. I did  find some time to browse around  some of my favorite challenge sites and was super pleased to see two of them team up for a great challenge!! Jingle Belles and Shopping Our Stash have an awesome challenge for us .....


"Isn't that a fantastic idea? Yep, we think so, too! So in honor of this special event, we've got a special "two-fer" challenge for you. Here's what to do:

1. Make a holiday card that uses something from your stash 
which is at least a year old.
2. Post the card on your blog or gallery, and be sure 
to tell us what your older stash item is.
3. Link your card at the bottom of this ♥JINGLE BELLES♥ post 
and also at this Shopping Our Stash post.
4. Check back at both blogs on July 17th to see if you've won 
one of the lovely prizes! (More on that in a minute!)"  - from JB blog
 
And they have a prize to be won- wot-woot!!! So be sure to check out both blogs .Here's my card:


So this card has nothing new on it.... the papers( Basic Grey Nordic collection) , stamps ( Deep Red Poinsettia Bloom),rhinestones ( Prima), Thickers ( American Crafts) and doily are all from my stash of at least a year old!!! The only thing that isn't old is the Gelatos(blue) that I used to shade in my poinsettia, but even the embossing powder is old ( probably at least 4 years old!!!!). What a fun challenge and I'm super happy to be using items from my stash.... gotta make room for new stuff,right???
 
So that's my JB and SOS card... hope you enjoyed! Thanks for stopping by!!


Friday, July 11, 2014

So Sweet Box card

Hi all! I made this cute little box card a few weeks ago and I wanted to share it with you today. Box cards are everywhere these days , you can so many great tutorials on how to make your , but I found an even easier and totally foolproof method- I purchased the svg file from SVG Cuts. I posted a video from YouTube ( click here) on the whole assembly process from SVG Cuts.

Here's one of my box cards.........


When you buy the files from SVG Cuts you get several different kinds of box cards plus blank box bases for you to let your creativity flow. I love the summery feel of this strawberry basket card and it was so simple to create. I just imported it to my Silhouette machine and then let it do all the hard work!!! I used CTMH cardstock,some Crate Papers, twine,rhinestones and a button from my stash  as well as a Quickcutz embossing folder for the strawberries . The sentiment is actually part of a small cupcake stamp that I've had forever. The files come with coordinating envelope files that fit these box cards perfectly.


I hoped you've enjoyed my version of the boxcard.... thanks for stopping by today!!


Box Card SVG Kit - Assembly Tutorial


Wednesday, July 9, 2014

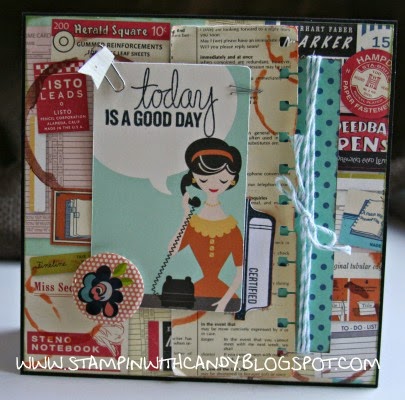
Today is a good day ....... for Mojo monday

Hi all! I'm back to share a card I made for this week's Mojo Monday challenge - here's the sketch:


I played around with a few products from October Afternoon 's 9 to 5 collection with a little Fancy Pants thrown in. Take a look.........


I love the cool retro office look of the 9to5 collection. All the papers and the journaling card and twine are from October Afternoon , the clip and button are from Fancy Pants. I used my Crafters Workshop stencil Coffee Splotches to age my papers with stains. There is minimal stamping on the front of this card...a sentiment from CTMH set called All the Details and a tab from True To Life.  This was a pretty simple and fun card to make and it's versatile for different occasions. Gotta love that!!!
 
Anyway... that's my  Mojo card- hope you liked! Thanks for dropping by!!!


Sunday, July 6, 2014

a few more layouts.......


Hi all! I just have a few more layouts to share with you. My scrapping mojo has been limited with the beautiful weather we've had this past week , but since today we are recovering from a summer storm brought on by hurricane Arthur, I decided to take advantage and post a few pages.

 
This one was made using papers from one of my favorite companies, Graphic 45. The collection is called Botanical Tea and I just love the vintage feel , which went nicely with some paper birds and flowers I had left over from K& Co. I used a stamp from CTMH that suits this page perfectly- hanging out with good friends!
 
The next layout I made for a  challenge from Frosted Designs. They provided a great sketch to play with:


You have to use a diecut in your layout... so I made mine with my Silhouette machine of course!

 
The triangles were cut out of the white cardstock and then I added some cute Crate papers behind each one. My Crafters Workshop stencils were used for
 the splatters and ring marks.I sprayed some and inked others.... so simple!!! The bits and pieces of life tag is from Simple Stories and the word Delight and butterflies are from Heidi Swapp epoxy collection. The banners are from Fancy Pants Designs.


Thanks for stopping by .... have a great day!
 

Mojo Monday card.... at the very last minute!!!

Good Sunday afternoon bloggers! As you can probably tell from my post title , I'm posting my Mojo card with little time to spare!!! I actually started my card a few days ago but then life got in the way ( yup, it seems to be doing that lots lately) and so I only just finished it and getting it here. Check  out Mojo Monday for details and lots of great inspiration.

Here's this week's sketch:
 
 
And here's my card......
 
 
I used Authentique papers for everything but the base which was CTMH Juniper cardstock.
The sentiment is a CTMH set called Card Chatter-Sympathy. I like the sentiments of this set and I think they can be used for more than sympathy- the inside of this card reads:" Just a little prayer that God will keep you in His care". I used Memento Rich Cocoa ink for the sentiement inside and out and Prima fluid chaulk inks for some edges.
I made a doily from a cutfile purchased online and cut with my Silhouette and while I was at it , I cut a circle ,too. Nice and easy! The chicken wire details were made with a Crafters Workshop stencil and crackle paste from Golden. I distressed everything with my new favorite tool, the Prima distressing tool. If you don't have this handy-dandy tool in your stash , get one!! It's so versatile- this lil' gem has a sanding surface , a distressing tool, a bone folder and a metal brush ( yup, metal) for really cool effects on your photos or papers. Best investment I've made in a long time!!
 
Well that's my card.. hope you enjoyed it! Thanks for stopping by today!