Friday, November 16, 2012

Thursday, November 15, 2012
Snowman starburst card
Hi all! I love trying new techniques and there is just so many wonderful resources out there to find great techniques to try out! I've seen the starburst technique on so many papercrafting sites from cardmaking to scrapbooking so I knew I just had to try it out for myself! I googled the technique and found several good tutorials.This week over at iSpy Sketches they have a starburst sketch challenge ;

Here's my first starburst card:


Here's my first starburst card:

I used an oldie but still a goodie stamp set from CTMH called Snow Friends .... isn't this little guy and his friend just so stinkin' cute!!! The papers used for the starburst is from Crate Paper " Snow Day"... this collection has a ton of cheerful and bright papers !! Can you see the sentiemnt on the front? It's much easier to see person!! It's a greeting from the October Stamp-of-the Month from CTMH called Very Merry Christmas.
Here's a close up of my snowman popped up.....

I stamped him first on a CTMH cardstock in Juniper ( used the same color ink) and then I stamped him again on white and fussy cut him out after I colored him with my Copics. To make the snowflakes pop out a little , I added a wee bit of Stickles to them and I did the same to his buttons ( just used brown instead of clear).
Of course, we are getting closer to Christmas every day , so I really needed to finish this card on the inside as well.....

Isn't that the cutest sentiment!!! It's also from the Snow Friends set . I stamped the base in Juniper and Early Espresso ( SU) and then matted more Crate Paper, just cause I love it so much!!!
This was such a fun card to create... I think I may be addicted to this style!!!
Thanks for stopping by today.... have a great rest of your day!!

Wednesday, November 14, 2012
Happy 50Th birthday card
Hi all! Just a quick post to share with you a card I made for a special someone (who shall remain unnamed!!!) who is turning 50 very soon! I love shaped cards and my Cricut is the perfect tool for this! Check it out....


I used the Artiste cartridge for the flowers , the circle mats and cardbase - it took longer to select the colors I wanted !! I love gray and yellow together and the paperpad I got from MME has several lovely papers with this combo. The birthday sentiment is from Verve Stamps ( Big Wish). The oval mat as well as the black label for the sentiment, and the leaves are from Stampin'Up! I have a stash of pearls , probably got them at a local $store. The cardstock & number stickers are from American Crafts.... this is the best cardstock I've found for cutting with my Cricut . CTMH cardstock cuts nicely as well.... SU cs I found to be too thick , especially for intricate cuts- it tends to tear ... ugh, so frustrating!!!
Anyway that's my card for today, hope you've enjoyed it! Thanks for stopping by my blog today!

Tuesday, November 13, 2012
Mojo Monday : Miss You card
Hi! It's only Tuesday and I have this week's Mojo Monday card completed... woot-woot!!! I got a bunch of goodies on a recent shopping trip ( this is a big deal for me since the nearest craft store is 8 hours drive!!!) and I've had so much fun creating with some of my new crafting stuff!! Of course, things are so much easier when you have such great inspiration to work with........

Here's my card.......


Here's my card.......

Supplies used:
Stamps :CTMH Frame It Up ( circle ) Verve Hope Blooms
Stampin Up! cardstock: Night of Navy/ink ,Daffidol Delight/ribbon
My Mind's Eye patterned papers
Memento ink : London Fog
Rhinestone : unknown source
Thanks for stopping by my blog today... have a great rest of your day!!!

Monday, November 12, 2012
My Mojo (#286) card .... a week late!!
Hi all! as you may have guessed from my post title , my card is late. I started to make my card for last week's Mojo sketch , but I got busy and then I was gone for a few days, so my card didn't get finished in time!!!! I thought I'd post it anyway since it's all ready to go. Here was last week's sketch
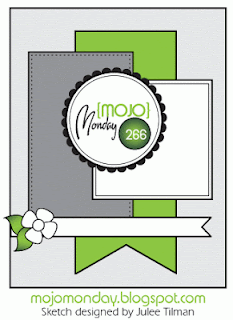


I love all those layers .... lot's of possibilities!! Here's what I came up with....

I purchased this stamp set( Christmas Blessings) from Stampin' Up! when I first got my 2012-13 catalogue in June. I had planned on using it for a class , but have decided to quit being a demo ( still love their products ) so it hasn't even been touched since the summer. It's such a lovely set and I know that it will get lots of use! The sentiment is from Flourishes Stamps and all other products are from Stampin' Up!, with the exception of the patterned paper ( Memory Box Inc)
Anyway, maybe if I start now I may get this week's Mojo sketch challenge finished in time!!! lol
Thanks for stopping by ... have a great rest of your day!!

Monday, November 5, 2012
Gift bag topper Tutorial
Hi all! I thought I'd post how I made my custom sized topper for giftbags. The gift bag that used was a kraft bag ( from Walmart) that measured 6.5X3" and was 9" high. You can adapt these instructions to fit just about any size gift bag.
Supplies used:
cardstock - 8.5X11 was used for this project
patterned paper for decorating
scoring tool /bone folder
paper trimmer
strong adhesive - I used the red sticky tape
Exacto knife and ruler
This is so super easy!!!! Just a few simple steps.......


With your ruler and Exacto knife, cut two slots for the handles. Then fold the corners inward. I added sticky tape to the inside , and the outside of the corner to make sure it stayed stuck together.

Once you've folded and adhered all the corners, it should look like this! Simple, huh?
Now comes the fun part, let your imagination take over and decorate your giftbag topper!! Here's mine....

Supplies used:
cardstock - 8.5X11 was used for this project
patterned paper for decorating
scoring tool /bone folder
paper trimmer
strong adhesive - I used the red sticky tape
Exacto knife and ruler
This is so super easy!!!! Just a few simple steps.......

Trim cardstock to 7X10.5". If you have a smaller or larger szed bag , then measure the base and add 2" to each side ( or less if you want it to be smaller). Score at 2' on all sides. Score all corners at diagonal, as indicated in the pic above. If you wish, you can use a border punch on the outside edges .. just start at the 2" score line.

With your ruler and Exacto knife, cut two slots for the handles. Then fold the corners inward. I added sticky tape to the inside , and the outside of the corner to make sure it stayed stuck together.

Once you've folded and adhered all the corners, it should look like this! Simple, huh?
Now comes the fun part, let your imagination take over and decorate your giftbag topper!! Here's mine....

I stamped the bag with CTMH 's Ornamental Cheer set and made a matching ornament tag with my Cricut and Art Philosophy for the topper. The ribbon and dp are from my stash of leftovers.
I hope you've enjoyed this quick tutorial...I'd love to see your creations- email me a link to what you've made!!
Thanks for stopping by today...... have a wonderful rest of your day!!

Saturday, November 3, 2012
Christmas duo- card and gift bag
Hello! Hope you're having a great Saturday so far! Have you checked out the current challenge at Jingle Belles yet? They have a guest Belle joining them this week and she has a great sketch for us to play along with! Click here to visit Allison Fillo's blog, Stampin When I Can. Here's her sketch for this week's JB challenge:

I decided that since the Christmas season is fast approaching that I should probably get a start on gift tags,etc. while I'm at it! So I made a bag topper to go along with my card.


I decided that since the Christmas season is fast approaching that I should probably get a start on gift tags,etc. while I'm at it! So I made a bag topper to go along with my card.

I found the idea for gift bag toppers on Pinterest ( the best place on the web to spend way too much time browsing!!!). Sorry the card looks a little blurry but I have more pics to share.....

Here's a better pic of my card... I incorporated all elements of the sketch except for the three embellishmnets on top ... I just couldn't get them to work!!!! I inked up SU's Greeting Card
Kids on a diecut ornament and then colored her with my Copic markers.
The inside is decorated with Michaels ornament stamps and a greeting from Flourishes called Sentimental Christmas. The cardstock / ink is from Stampin' Up! and the patterned papers are from Michaels' Recollection Christmas 2011 paperline. The sparkly stickers are from American Crafts. I used an embossing folder ( Lifetstyle Crafts) for the banner on the card front. The diecut ornament and Merry Christmas were made with my Cricut ( Art Phiosophy and Artiste cartridges).
That's my Jingle Belles card for the Do You Sketch What I Sketch? challenge.
Thanks for stopping my blog today!

Subscribe to:
Posts (Atom)